Magento 2 Full page Caching With Varnish In Depth
What is Full Page caching
In todays world its very important that we serve any page within 3s to retain the customer. In a system like Magento which involves very heavy operation to generate a page content it has become mandatory to to make use to caching mechanism which will avoid hitting the backend server for every request.
Magento FPC is a caching mechanism where the entire HTML page content / GraphQl Response is stored in the Cache when a user visits a page for the first time. This cached version is then served to subsequent visitors, eliminating the need to generate the same page each time a user accesses it.
Why Varnish for FPC
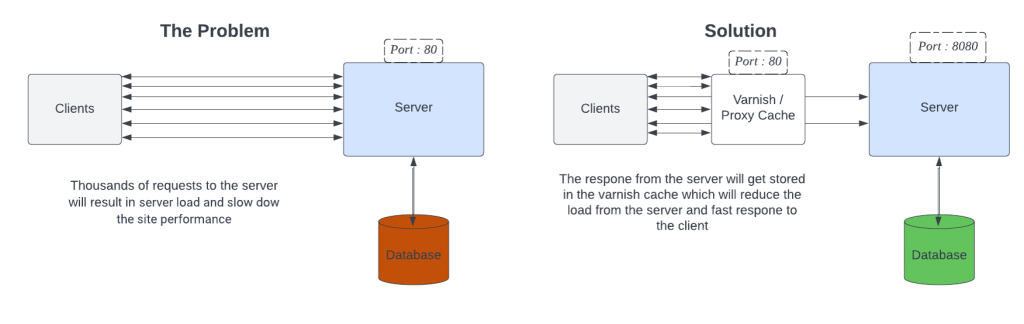
Varnish is a high-performance HTTP accelerator or Reverse Proxy caching that can cache the entire HTML output of a web page and serve it to subsequent visitors, without having to regenerate the page content from the server. Here are some benefits of using Varnish for Full Page Caching.
- High scalability: Varnish is highly scalable and can handle large amounts of traffic with ease. It uses a multi-threaded architecture that allows it to serve thousands of requests per second, making it an ideal solution for high-traffic websites.
- Flexible caching: Varnish offers a flexible caching mechanism through its VCL configuration file which allows the users to configure caching rules based on their specific needs. This enables users to cache content more efficiently and improve website performance.
- Easy to use: Varnish is relatively easy to use and can be installed and configured with minimal effort. It also comes with a range of tools and plugins that make it easy to integrate with other web technologies.
- Open-source: Varnish is an open-source solution, which means that it is freely available and can be customized according to specific needs. This also means that it has a large and active community of users who provide support and contribute to its development.
- High performance: Varnish is known for its exceptional performance and speed. It can serve cached content in milliseconds, making it one of the fastest caching solutions available.
What is Reverse Proxy Caching
A Reverse proxy caching is a caching technique used by reverse proxy servers or varnish server to improve website performance by caching frequently requested content on the server side. It’s a piece of software that you put in front of your web server(s) to reduce the loading times of your website/application/API by caching the server’s output. By caching the response content, Varnish reduces the number of requests that need to be processed by the server, freeing up resources to handle other requests. This can result in improved server performance and the ability to handle more traffic.
As varnish caching is related to HTTP caching, Lets first understand what HTTP caching is.
HTTP caching
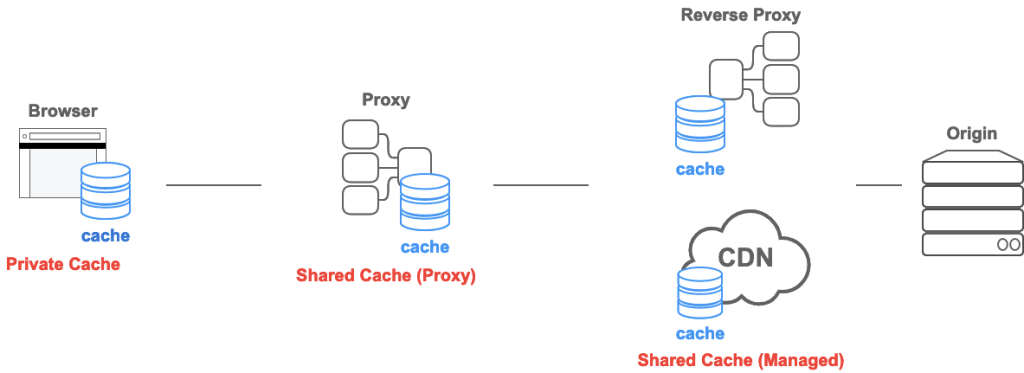
Between a browser and the backend server we have the below entities.
- Browser Cache
- Proxy Cache
- Reverse Proxy Cache
- CDN
HTTP caching is a caching mechanism that is built into the HTTP protocol that allows these entities to store and reuse HTTP responses. There are two main types of caches: private caches and shared caches.
Private Cache
Private caches are caches that are stored in the client browser itself. When a user visits a web page, the web browser checks its private cache to see if it already has the resources required to render the page. If the resources are present in the cache and have not expired, the browser can use them to render the page without making additional requests to the server.
The shared cache is located between the client and the server and can store responses that can be shared among users. And shared caches can be further sub-classified into proxy caches and Reverse Proxy Cache (managed caches)
Proxy Caches
To reduce the traffic out of the network some proxies(The servers in the network) implement caching. This is usually not managed by the service developer, so it must be controlled by appropriate HTTP headers and so on. However, in recent years, as HTTPS has become more common and client/server communication has become encrypted, proxy caches in the path can only tunnel a response and can't behave as a cache, in many cases.
Reverse Proxy Cache (Managed Cache)
Reverse Proxy Caches are explicitly deployed by service developers to reduce the traffic to the origin server and to deliver content efficiently. Varnish Cache is an example of Reverse Proxy Cache.
HTTP Header Communication
Not all HTTP responses should be cached. Now the question come how does these caching system known if they need to cache a particular response or not. This information should come from the backend server. In general a HTTP response from the server would contain Headers and Body where HTTP headers are used to transmit additional information between a client and a server during an HTTP request/response transaction.
The server uses certain HTTP header to communicate to the client or proxy server. These headers serve a variety of purposes along with those we can also tell the client / proxy if they need to cache the response or not. In the below section we will see what Headers are used in terms of Caching.
Cache-Control HTTP Header
The Cache-Control HTTP header field holds directives (instructions) — in both requests and responses — that control caching in browsers and shared caches (e.g. Proxies, CDNs).
Cache-Control:max-age=86400, public, s-maxage=86400
The Cache-Control header is an HTTP response header that specifies how a resource should be cached and for how long. It provides instructions to the client, such as a web browser, on whether or not to cache a resource, how long to cache it, and under what conditions the cached copy can be used.
The Cache-Control header can be used to specify a number of directives, including:
- public: The resource can be cached by any cache, such as web clients and caching proxies.
- private: The resource can only be cached by the client, and not by any intermediary caches.
- max-age/s-maxage: The maximum time in seconds that a resource can be cached. The
s-maxagedirective does the same asmax-age, but it is intended for caching proxies rather than for web clients. - no-store: The resource should not be cached at all.
- no-cache:
- The resource can be cached, but must be revalidated with the server before it can be cached and used.
- Now the question comes, If we need to send a request to the server every time to revalidate what is the point in creating the cache in the first place.
- The idea here is using the revalidation techniques we will avoid re-downloading the entire content again, This is done using the header Etag or Last-Modified
- This is primarily used for caching CSS/JS/Images where we can avoid fetching the complete content from the server every time.
- must-revalidate: The resource must be revalidated with the server before it can be used after it has expired.
Expires Header
The Expires header can also be used to set the time to live of an object.
- Expires: Sat, 4 May 2024 08:00:00 GMT
- This cacheable resource is considered fresh until Saturday May 4th 2024 at 8 o’clock GMT.
- Expires: -1
- The "-1" value indicates that the content has already expired and that the content of the HTTP response should not be cached by the browser or any intermediate caches.
Cache-Control Header for Varnish Server
One of the problem with storing the response in the Client Browser is that its rather impossible to clear the cache unless and until the cache expires or the customer deletes the browser cache manually. This type of caching might be useful for Blogs or News Articles where we are sure that the content will not change often but in our case the content are much more dynamic where we cannot save it in client brower. So our first step would be to add the relevant information in the HTTP header so that the data is not cached in the client browse but only in Varnish Server.
To achieve this we need to make use of the Cache-Control and the Expires Header together. Because with Cache-Control we can set either Public or Private. With public, The cache content will get stored in the Varnish Server as well as Browser Client. So to avoid storing in Browser we need the Expires Header as shown below.
Cache-Control: max-age=86400, public, s-maxage=86400
Expires: -1
This Header setting is done in this file, \Magento\Framework\App\Response\Http::setPublicHeaders
$this->setHeader('pragma', 'cache', true);
$this->setHeader('cache-control', 'public, max-age=' . $ttl . ', s-maxage=' . $ttl, true);
$this->setHeader('expires', $this->getExpirationHeader('+' . $ttl . ' seconds'), true);

---------------------
Output (Assuming, Today is 05 Mar 2023):
Cache-Control: max-age=86400, public, s-maxage=86400
Expires: Mon, 06 Mar 2023 17:07:31 GMT
Below is the actual header that we can see in the client browser

Though we have the Cache-Control header indicates to cache the response for 1 day, The response will not be caused because of the Expires header which is set to "-1" which means the content is already expired and the client needs to fetch the data from the server.
Now you might question, We where setting "Mon, 06 Mar 2023 17:07:31 GMT" for the Expires header but where does the "-1" comes from ? This is actually set in the varnish server through the VCL file.

When the backend server sends the response back to the Varnish server we will have Expires header set to "Mon, 06 Mar 2023 17:07:31 GMT" but the varish server when send the content to the client it overwrites this Expires headet to "-1" due to which the response will get cached in the varnish server but never in the client browser. The VCL configuration for the same is mentioned below.
    # Not letting browser to cache non-static files.
    if (resp.http.Cache-Control !~ "private" && req.url !~ "^/(pub/)?(media|static)/") {
        set resp.http.Pragma = "no-cache";
        set resp.http.Expires = "-1";
        #set resp.http.Cache-Control = "no-store, no-cache, must-revalidate, max-age=0";
    }
Saving Data in Varnish.
Now that we have made sure the HTML response is not cached in the client, Our next step would be to store the response in the varnish cache. Any caching mechanism you implement there will be two important thing, The Cache key and the Actual Cache Data. To store a cache data varnish first need to create the cache key, which will be later used to see if the cache exist or not.
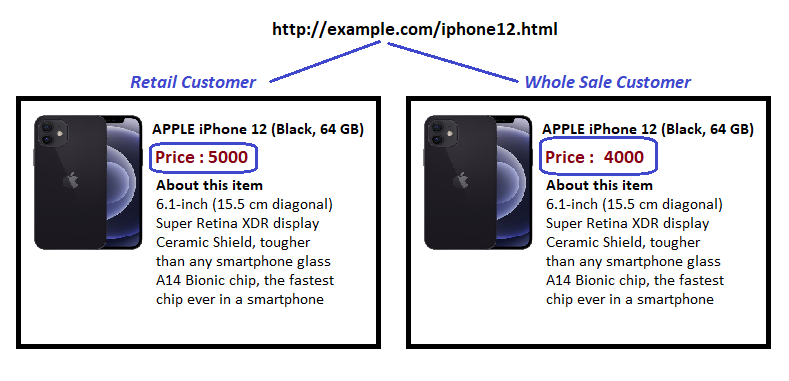
Lets consider an example, A client is requesting this product detail page URL http://example.com/iphone12.html.
Now Varnish cache needs to first find, if a cached data already exists for this url. To do so it needs a cache key right, Usually varnish creates a cache key using the requested URL.
In a default varnish setup the cache key is generated based on URL.
sub vcl_hash {
    hash_data(req.url);
    return (lookup);
}
This piece of code hash_data(req.url) in the VCL file is used to generate the cache key, In this case we are just creating a cache key with the request url then the lookup method will check if any cache is available for this key. If cache exists then the varnish server will respond back to the client directly without contacting the server.
Cache Variations
The above example is a very basic caching, But this will not be efficient in terms of Magento because in our case, a given product URL can have different content.
Lets say if we have 2 customer group Retail Customer and WholeSale Customer in our system and the product price will vary depends upon the customer group. So for the same URL iphone12.html the content will differ based on the customer who is requesting the page, technically we will have 2 page contents for the same URL. So varnish system should have 2 cache content for the same URL.
In-Fact Magento has the below Context Parameters that will affect the page content.
- Customer Type
- Customer Logged In
- Customer Group
- Customer Segment
- Store
- Current Currency
- Tax Rates
So how does varnish know if a page has multiple cache version? Varnish is just a cache server it will not know anything about the context parameters. This information should come from the backend server. This is where X-Magento-Vary Cookie and X-Magento-Cache-Id header comes in to picture where magento uses this cookie and header to communicates with the varnish server .
X-Magento-Vary Cookie
The X-Magento-Vary cookie is used by Magento to ensure that dynamic content, such as prices, currency, store specific information are not cached incorrectly.
Usually when the varnish server creates a cache it firsts generates the cache key using the URL. But we have a scenario where a single url will have multiple page content depends upon the context parameter and if the the cache key is created only based on URL it will end up serving invalid data to the user. To overcome this issue magento will generate the cache key along with generating the page content based on the context parameters that are relevant to that page.
For ex, While generating the page content for iphone12.html if customer group context parameter is relevant, then magento will create a cache key with the current visitors customer group and then hand over this cache key to Varnish Server. Varnish server will then use this cache key along with the url to create the cache key for that page.
This will results in creating multiple cache variations for the same page, some thing like the below
| Visitor | url | Response | Magento Cache Key | Varnish Cache Key |
| Whole Sale Customer | iphone12.html | Content For Whole Sale Customer | sha1("wholesale") = 8c941ab6f6d3 | (iphone12.html + 8c941ab6f6d3) |
| Retail Customer | iphone12.html | Content For Retail Customer | sha1("retail") = 46bb7e3c2f | (iphone12.html + 46bb7e3c2f) |
This context parameter cache key is generated by the \Magento\Framework\App\Http\Context class, This class has a class level array property $data which will hold all the context parameter that are involved in the respective page generation. The setValue() of this Context class can be called to set the context parameters as shown below.
//In the below code customer group context parameter is set
$this->httpContext->setValue(
	'customer_group',
	$this->customerSession->getCustomerGroupId(),
	GroupManagement::NOT_LOGGED_IN_ID
);
Once all the Context Parameters are set, The vary hash is generated just before sending the response back. \Magento\PageCache\Model\App\Response\HttpPlugin::beforeSendResponse
//\Magento\Framework\App\Http\Context::getVaryString
public function getVaryString()
{
	$data = $this->getData();
	if (!empty($data)) {
		ksort($data);
		return sha1($this->serializer->serialize($data));
	}
	return null;
}
This vary string (cache key) is handed over to varnish server through the X-Magento-Vary cookie.
\Magento\Framework\App\Response\Http::sendVary
$varyString = $this->context->getVaryString();
$this->cookieManager->setSensitiveCookie('X-Magento-Vary', $varyString);
// Sensitive cookies cannot be accessed by JS. HttpOnly will always be set to true for these cookies.
Varnish server cache uses the value in this cookie to create a cache key, In the Varnish VCL that is shipped with magento we have this customization done.
hash_data(regsub(req.http.cookie, "^.?X-Magento-Vary=([^;]+);.*$", ""));
This line will tell varnish, Along with the url cache key, You also use this value in the X-Magento-Vary cookie value to create the cache key hash.
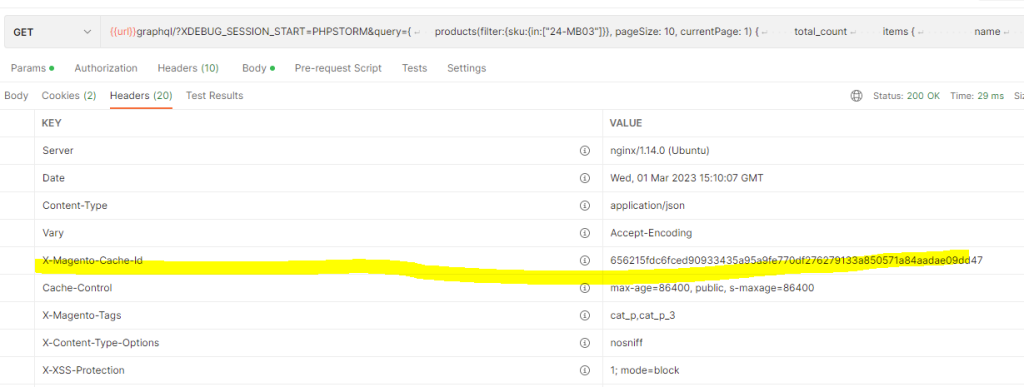
X-Magento-Cache-Id
Magento Open Source 2.4.4 introduces the X-Magento-Cache-Id response header. X-Magento-Cache-Id Header is similar to X-Magento-Vary cookie. Since cookies doesn't make sense for GraphQl requests the X-Magento-Cache-Id Header is used but both serves the same purpose. This header is returned with every GraphQL GET and POST request, The POST request will not be cached.
Its value is an SHA hash comprised of several factors that are specific to the customer's context.
The following values are concatenated prior to being hashed:
- The store ID
- The currency code of the store, such as USD or EUR
- A Boolean value indicating whether the customer is logged in (true or false)
- The customer's group ID
- The customer's tax rate, expressed as a percentage, such as 0.0875
- A Salt Value
- \Magento\GraphQlCache\Model\CacheId\CacheIdCalculator::getSalt
- In the env.php this value is usually set
//Plugin for GraphQL after render from dispatch to set tag and cache headers
\Magento\GraphQlCache\Controller\Plugin\GraphQl::afterRenderResult
In this plugin the arrayVariable idFactorProviders is looped through and the cache id is generated.

And in the Varnish VCL file we have the condition to check if the request is from grapqhql If so then use this header value of X-Magento-Cache-Id to create the cache key hash.
if (req.http.X-Magento-Cache-Id) {
    hash_data(req.http.X-Magento-Cache-Id);
}
This cache value can be seen in the header X-Magento-Cache-Id as shown below.
Clearing Cache From Varnish
Being eCommerce, The data such as product detail, price, promotions, stock will get changed frequently or periodically, and it would not be nice if we are keep serving outdated data to the customer from the varnish server right.
Clearing the data from Varnish is done by 2 Methods
- Through Cache Control Header
- Using Varnish Bans
Clear Cache using Cache Control Header
The ‘Cache-Control’ header instructs varnish server how to handle the content. Varnish cares about the max-age parameter and uses it to calculate the TTL for an object. This TTL is configurable through backend.

Based on this configuration the cache control header is set. Which is done in the below code.
//\Magento\PageCache\Model\Layout\LayoutPlugin::afterGenerateElements
//\Magento\Framework\App\Response\Http::setPublicHeaders

$this->setHeader('cache-control', 'public, max-age=' . $ttl . ', s-maxage=' . $ttl, true);
Every cached content (aka object) stored in cache has a lifetime which defines how long an object can be considered fresh, or live, within the cache. When creating the cache, Varnish server uses the max-age value to set the cache expiry time
In the VCL file we have the below code snippet where we check if the cache is still valid if so we just return the content from the cache.
if (obj.ttl >= 0s) {
   # Hit within TTL period
   return (deliver);
}
Grace Period
Varnish provides several features that prevent customers from experiencing long delays and timeouts when the Magento server is not functioning properly. One such feature is called Grace.
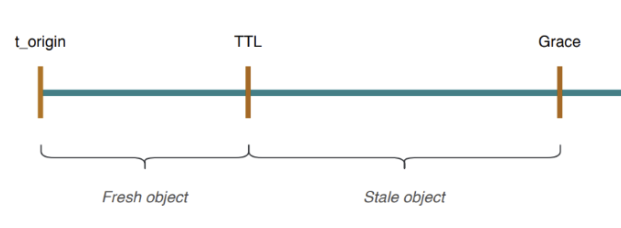
The lifetime of a cached object is represented by the timeline shown in the picture. The life of an object starts at the t_origin which is the time when the object was inserted in cache.
An object lives in cache until TTL + Grace elapses, after that time the object is removed by the Varnish daemon. Objects within the TTL are considered fresh objects, while stale objects are those whose lifetime is between TTL and Grace, this is called grace period.
This grace period can be configured through backend

Grace mode enables Varnish to keep an object in cache beyond its TTL value. Varnish can then serve the expired (stale) content while it fetches a new version. This improves the flow of traffic and decreases load times. It’s used in the following situations:
- When the Magento backend is healthy, but a request is taking longer than normal
- When the Magento backend is not healthy.
Now the question comes how does the varnish know the health of the backend server ? This is done by a mechanism called "probe".
A probe is essentially a periodic health check that Varnish sends to a backend server to determine if it is available and functioning properly. Probes can be defined in Varnish VCL (Varnish Configuration Language) using the probe keyword as shown below.
backend default {
    .host = "localhost";
    .port = "8080";
    .first_byte_timeout = 600s;
    .probe = {
        .url = "/pub/health_check.php";
        .timeout = 2s;
        .interval = 5s;
        .window = 10;
        .threshold = 5;
   }
}
In the above example Varnish will check the health of backend server every 5 seconds, timing out after 2 second. If 5 out of the last 10 polls succeeded the backend is considered healthy, otherwise it will be marked as sick.
Now that the varnish server can know the health of the Backend Server, We can now decide what we can do once the cache got expired.
This below VCL snippet describes how Varnish handles grace period.
  if (std.healthy(req.backend_hint)) {
	if (obj.ttl + 300s > 0s) {
		# Hit after TTL expiration, but within grace period
		set req.http.grace = "normal (healthy server)";
		return (deliver);
	} else {
		# Hit after TTL and grace expiration
		return (restart);
	}
} else {
	# server is not healthy, retrieve from cache
	set req.http.grace = "unlimited (unhealthy server)";
	return (deliver);
}
If the object in the cache has expired, Varnish checks if the backend server is healthy by using the "std.healthy" function. If the backend_hint pointer is valid, Varnish checks if the object can still be delivered from the cache within the grace period (i.e., obj.ttl + 300s > 0s).
As per the Magento Document, If the grace period hasn’t expired, Varnish delivers the stale content, and asynchronously refreshes the object from the Magento server. (Note: I couldn't find out how exactly this asynchronously refresh is happening , Will update once I have more info on this)
If the grace period has expired, Varnish serves the stale content and synchronously refreshes the object from the Magento backend.
If the backend_hint pointer is not valid (i.e., the backend server is not healthy), Varnish delivers the object from the cache.
When a backend server becomes healthy again, Varnish Cache will detect this through its ongoing health checks. Once a backend server passes the health checks, Varnish Cache will mark the server as healthy again and start sending requests to it.
Cache Tags
So for we have discussed that once the Cache is stored in the Varnish it will remain there till it expires. This will not be a best user experience as the data in an eCommerce system may tent to change often.
For ex If a product becomes out of stock this needs to be updated right away we cannot allow the varnish server to keep showing the product as IN STOCK. To solve this issue when a change is made in Magento say we are updating the product iphone12 then we need to remove all the caches related to the product iphone12 in varnish server right .
But how to do it ? The product iphone 12 might be get displayed in multiple pages like PDD, PLD, HomePage, UpSell, CrossSell etc so to find out all the places where this product is displayed and clearing those cache is literally impossible.
To solve this, Magento Introduced Cache Tags for Page Content and uses Varnish Bans to clear the caches based on Cache tags.
What is Varnish Bans
Varnish Bans is a feature of the Varnish Cache server that allows you to selectively purge cached content based on certain criteria. When you issue a Varnish Ban command, Varnish will scan its cache and remove any cached objects that match the specified criteria. You can think of bans as a sort of a filter on objects already in the cache. A ban will only work on objects already in the cache. A Varnish ban consists of a set of conditions that match against the objects in the cache. When a ban is executed, all objects in the cache that match the conditions are removed.
A Varnish Ban consists of a ban expression that defines the set of cached objects to be purged, and a ban action that specifies what to do with those objects. The ban expression can include one or more conditions, such as URL patterns, headers, or cookies.
To filter out multiple cache objects we need some kind of identifiers right, This is where cache tags are used.
A Page is collection of independent content such as Header Block, Footer Block, Filter Nav, Product A, Product B, Product C etc. Now the idea here is all these independent contents are given a unique cache tag and finally all these cache tags are combined together in a comma separated string and assigned to the page. In case if there is a change in the Footer Block we can tell varnish to clear all the cached pages where it has the Footer Block cache tag.
Lets see this through an example
The Product Iphone 12 can be displayed in multiple pages, To identify these pages that are related to the product iphone 12 we can do some thing as described in the below image
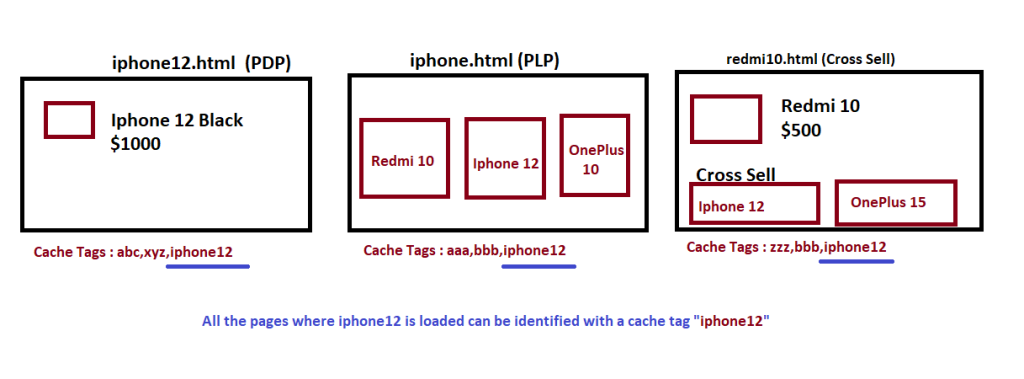
For all the pages where iphone 12 is involved we can add a cache tag named "iphone12" post that to clear the cache that are related to iphone 12 we can just tell varnish to clear all the caches that contains the cache tag."iphone12"
How Cache Tags are Generated
The cache tags is a list of cache identifiers that corresponds to the content on the page. These cache tags are generated based on the data being requested. For example, if a user requests a product page, the response might include cache tags for the product, the category it belongs to, and the store view.
Lets take an real time example page where we are displaying the below blocks
- A Product
- Blog Post List
- Footer Block

Along with generating the content of these sections, Magento will also maintain a cache entities list related to these sections. In the case of Blog Post we are displaying 2 posts in this page so the cache identities post_1 and post_2 will be added to the cache list. Here the word "post_" is custom string that you would have defined in the Post Model. and "1","2" are the post ids.
These cache tags are generated using Identity Interface.
Identity Interface
The Identity Interface is an interface that defines the behavior of objects that can be identified by a unique key. This unique key is used to track changes to the object, so that the object can be invalidated or refreshed when necessary.
If you need your content to be cached in FPC, then you must create an Identity class for the module. The class must return unique identifiers for cache tags that can be invalidated when an entity changes. Place this class in your module’s Model/Resolver directory.
An Identity class implements Magento\Framework\GraphQl\Query\Resolver\IdentityInterface. Your Identity class must contain the following elements:
- Choose a cache tag prefix for the entity.
- Your implementation of the
getIdentities(array $resolvedData)method. The method maps the array of entities data to an array of cache tags, one for each entity. Generally, this method takes an array of query results and creates a cache tag for each entity based on the original string and the unique identifier for each item to be cached. For example, thegetIdentitiesmethod for theCatalogGraphQlcomponent appends the product ID to thecat_pcache tag prefix, such ascat_p_1,cat_p_2, and so on. Usually the method also adds the cache tag without an appended ID to the result array, so all cache records can be removed at once, and not only cache records for specific entities.
Identity Interface can be implemented by a Model or Block Class.
In the below example we see the Post Model which has implemented the IdentityInterface
class Post extends AbstractModel implements IdentityInterface
{
    const CACHE_TAG = 'post';

    protected function _construct()
    {
        $this->_init(\Moses\Crud\Model\ResourceModel\Post::class);
    }

    public function getIdentities()
    {
        return [self::CACHE_TAG . '_' . $this->getId()];
    }
}
getIdentities(): This method returns an array of unique identity keys for the object. These keys are used to track changes to the object and to invalidate the cache when necessary.
And in the Block Class we also implement Identity Interface
class Postlist extends Template implements IdentityInterface
{
    public function getIdentities()
    {
        $identities = [];
        foreach($this->getPostList() as $post) {
            $identities = array_merge($identities,$post->getIdentities());
        }
        return $identities;
    }
    public function getPostList()
    {
        return $this->postCollection->getItems();
    }
}
Finally Magento while rendering the content it will also retrieve all cache tags ids of the blocks which is done in the below code.
- Find All the blocks that belongs to this Layout
- If ESI Block (we will see this in the next section) Ignore
- For the rest of the blocks, Get the cache Identities and set it to the X-Magento-Tags Header so that varnish can make use of it at the later time while purging the cache.
\Magento\PageCache\Model\Layout\LayoutPlugin::afterGetOutput
public function afterGetOutput(Layout $subject, $result)
    {
        if ($subject->isCacheable() && $this->config->isEnabled()) {
            $tags = [];
            $isVarnish = $this->config->getType() === Config::VARNISH;

            foreach ($subject->getAllBlocks() as $block) {
                if ($block instanceof IdentityInterface) {
                    $isEsiBlock = $block->getTtl() > 0;
                    if ($isVarnish && $isEsiBlock) {
                        continue;
                    }
                    $tags[] = $block->getIdentities();
                }
            }
            $tags = array_unique(array_merge([], ...$tags));
            $tags = $this->pageCacheTagsPreprocessor->process($tags);
            $this->response->setHeader('X-Magento-Tags', implode(',', $tags));
        }

        return $result;
    }
Configure Commerce to purge Varnish
Now that we have set the cache tags its time to configure magento to purge the cache based on tags. Commerce purges Varnish hosts after you configure Varnish hosts using the magento setup:config:set command.
You can use the optional parameter --http-cache-hosts parameter to specify a comma-separated list of Varnish hosts and listen ports. Configure all Varnish hosts, whether you have one or many. (Do not separate hosts with a space character.)
The parameter format must be <hostname or ip>:<listen port>, where you can omit <listen port> if it is port 80.
For example,
bin/magento setup:config:set --http-cache-hosts=192.0.2.100,192.0.2.155:6081
This would create a entry in the evn.php
'http_cache_hosts' => [
        [
            'host' => 'localhost'
        ]
    ]
How MDC Triggers the Varnish Ban
The Varnish Cache Purge Triggers are configured through events. The default events are configured in vendor/magento/module-cache-invalidate/etc/events.xml
    <event name="clean_cache_by_tags">
        <observer name="invalidate_varnish" instance="Magento\CacheInvalidate\Observer\InvalidateVarnishObserver"/>
    </event>
    <event name="adminhtml_cache_flush_system">
        <observer name="flush_varnish_pagecache" instance="Magento\CacheInvalidate\Observer\FlushAllCacheObserver"/>
    </event>
On events such as Editing a Model or Clearing the Cache a HTTP purge request call is triggered to Varnish with the respective cache tags. In case if you are implementing a custom model where update/delete happens programmatically or any other means you might need to trigger this additionally.
| MDC Action | Varnish Purge Request |
| php bin/magento cache:clean | PURGE / HTTP/1.1 X-Magento-Tags-Pattern: .* Host: localhost |
| On Editing a Blog through Admin Section | PURGE / HTTP/1.1 X-Magento-Tags-Pattern: ((^|,)blog_1(,|$)) Host: localhost |
If varnish sever received a PURGE request from MDC it will register a Varnish Ban and remove all the cache objects that are related to the respective Tag. This is done in the below VCL code.
if (req.method == "PURGE") {
    if (req.http.X-Magento-Tags-Pattern) {
      ban("obj.http.X-Magento-Tags ~ " + req.http.X-Magento-Tags-Pattern);
    }
}
To Cache GraphQl requests in Varnish
To make a graphql request you need to define the cacheIdentity Class in the graphql type declaration.
type Query {
    blog(
        search: String
    ): BlogResult
    @resolver(class: "Moses\\Blog\\Model\\Resolver\\BlogQuery")
    @cache(cacheIdentity: "Moses\\Blog\\Model\\Resolver\\BlogQuery\\Identity")
}
The Identity Class need to implement the IdentityInterface.
The getIdentities method would return the cache tags that are involved in the response. The items that are returned for the graphql request will be available in the $resolvedData array.
class Identity implements IdentityInterface
{
    private string $cacheTag = Product::CACHE_TAG; // The Blog Model Cache Tag

    public function getIdentities(array $resolvedData): array
    {
        $ids = [];
        $items = $resolvedData['items'] ?? [];
        foreach ($items as $item) {
            $ids[] = sprintf('%s_%s', $this->cacheTag, $item['entity_id']);
        }
        return $ids;
    }
}
Varnish Hole Punching for Dynamic Content
So for we have discussed that if we need to clear the cache for a block or a section within a page we need to completely remove the cache of the whole page. This will not be a ideal case for blocks such as Logged In Customer Name, Customer Cart Items or Recently Viewed Products etc where the data gets updating more often. Removing the whole page cache for blocks where data is more dynamic will result in Performance issues. So to load the dynamic blocks we can make use of a technique call Hole Punching.
Varnish Cache Hole Punching is a technique that allows to remove a specific pieces of content from the cache while still retaining the other content. It is used when you have dynamic content that needs to be cached, but there are some parts of the content that are personalized or customized for each user, so they cannot be cached.
Varnish Cache Hole Punching is a useful technique for improving website performance by selectively caching content while still providing personalized or dynamic content to users.
Hole Punching can be achieved through 2 methods
- ESI Tags
- Ajax
ESI Tags (Edge Side Includes)
Varnish can create web pages by assembling different pages, called fragments, together into one page. These fragments can have individual cache policies. If you have a web site with a list showing the five most popular articles on your site, this list can probably be cached as a fragment and included in all the other pages.
Used properly this strategy can dramatically increase your hit rate and reduce the load on your servers.
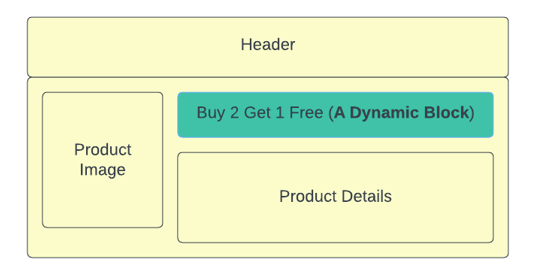
Lets see how this works with an example webpage where have the below blocks
- Static Blocks
- Header
- Product Image
- Product Details
- Dynamic Block
- Promotion Message Block
- Since the Promotion Message Block is more dynamic in nature, We have used the ESI tags strategy to load this page.
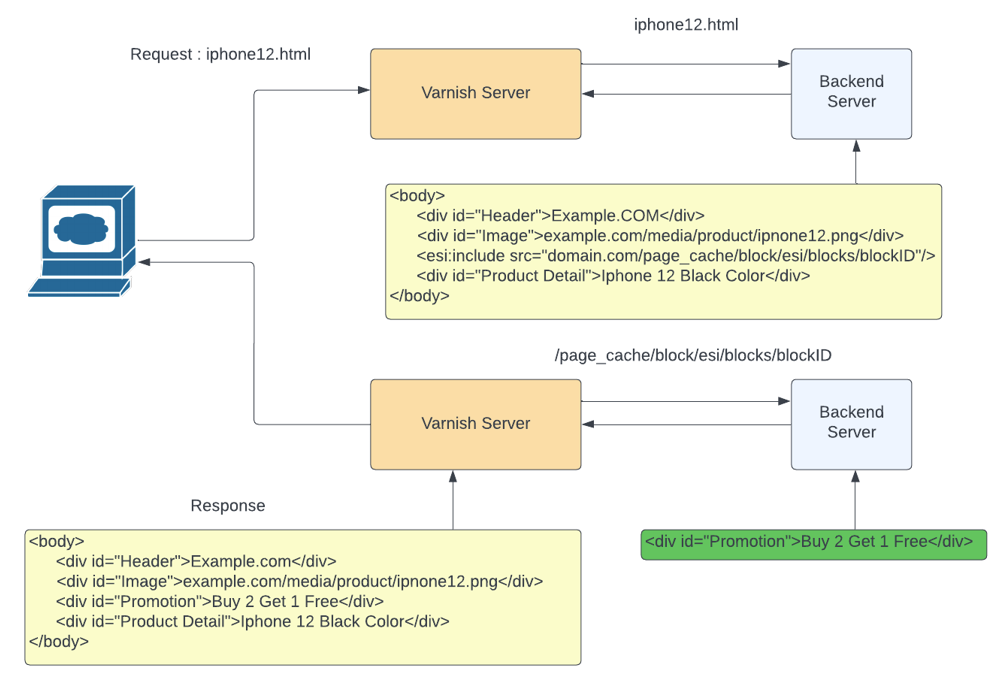
The real time request and response flow is described below.
- Client request the page iphone12.html
- The Server generates the content for all the Blocks except for the ESI Block
- For the ESI Block it will not give the actual content but a ESI Tag with the ESI URL
- Ex : <esi::include src="http://example.com/page_cache/block/esi/blocks/catalog.topnav/handles/WyJkZWZhdWx0IiwiY2F0YWxvZ19wcm9k/" />
- Varnish server received the content along with the esi tag.
- When the varnish server sees an ESI tag in the content, It again triggers the URL of the ESI tag to fetch the actual content
- Note: The Browser will not know anything about the ESI tag or the URL. The ESI urls will be always triggered by the varnish server
- Once the Varnish server get the content for the ESI tag, It replaces the ESI tag with the actual content of the ESI Block and gives the final content to the Client
This is illustrated in the below image.
How to Create a Magento Block to Load with ESI Tag
The Commerce framework creates an ESI tag when the following conditions are met:
- The caching application is set to
Varnish Cache - A XML layout
blockelement is added with attlattribute
Ex
<referenceContainer name="content">
      <block class="Magento\Framework\View\Element\Template" template="Magento_Paypal::esi.phtml" ttl="30"/>
   </referenceContainer>
Magento loads the TopMenu menu using ESI tags
<block class="Magento\Theme\Block\Html\Topmenu" name="catalog.topnav" template="Magento_Theme::html/topmenu.phtml" ttl="3600" before="-"/>
On this event "core_layout_render_element" The observer ProcessLayoutRenderElement will check if the Block is of ESI type, If so it will not generate the content of the Block But a ESI url will get generated.
<event name="core_layout_render_element">
<observer name="pagecache" instance="Magento\PageCache\Observer\ProcessLayoutRenderElement" />
</event>
\Magento\PageCache\Observer\ProcessLayoutRenderElement::execute
if ($block instanceof \Magento\Framework\View\Element\AbstractBlock) {
	$blockTtl = $block->getTtl();
	$output = $transport->getData('output');
	if (isset($blockTtl) && $this->isVarnishEnabled()) {
		$output = $this->_wrapEsi($block, $layout);
\Magento\PageCache\Observer\ProcessLayoutRenderElement::_wrapEsi

 $url = $block->getUrl(
	'page_cache/block/esi',
	[
		'blocks' => $this->jsonSerializer->serialize([$block->getNameInLayout()]),
		'handles' => $this->base64jsonSerializer->serialize(
			array_values(array_diff($handles, $pageSpecificHandles))
		)
	]
);
// Varnish does not support ESI over HTTPS must change to HTTP
$url = substr($url, 0, 5) === 'https' ? 'http' . substr($url, 5) : $url;
return sprintf('<esi:include src="%s" />', $url);
A Sample ESI Block and a URL will be like the below
<esi:include src="http://example.com/page_cache/block/esi/blocks/catalog.topnav/handles/WyJkZWZhdWx0IiwiY2F0YWxvZ19wcm9k/" />
To get the actual content of the MenuBlock Varnish server will get trigger the ESI URL
Hole Punching Using Ajax for Private Content
The Private content is specific to individual users and has shorter life span and must not be sharable.
To Load these private content Such as Customer Details, MiniCart, Recently Viewed Products etc Magento uses Ajax.
These data are differentiated in to several sections and are loaded in a single ajax call. Since private content is specific to individual users, it’s reasonable to handle it on the client side i.e. web browser. A section is a piece of customer data grouped together. Each section is represented by the key that is used to access and manage data itself. Magento loads sections by AJAX request to /customer/section/load/ and caches loaded data in the browser local storage under the key mage-cache-storage. Magento tracks when some section is changed and load updated section automatically.
These sections are configured using sections.xml which we will see in some other article some day......