Virtualization & Docker Fundamentals for Beginners
Why Docker
Docker primarily helps in 2 scenarios.
Local Development
Lets say if you want to install Magento, First you have to install the below applications as per the system requirement
- PHP
- Nginx
- MySql
- Elasticsearch
- RabbitMq
- etc
To do so you have the look for all the respective installation steps and install it one by one, may be not so tough. But consider you are working on 2 projects where the first project requires php7.4 and the second one required php8 you will require 2 php version running on the same machine This is also possible but you will definitely spend more time on installing and configuring the application rather than coding.
Deployment
Lets say as a team you are supposed to develop a application in PHP7.4 and one of your team member by mistake has installed PHP8 and unknowingly he had used a PHP8 method which will obviously work in his Local environment. but when this code get pushed to the server which will be in php7.4 it will break. So to avoid this kind of failures instead of just moving the source code why not move php7.4 as well, Good Idea theoretically but how its possible in real time ?
The question that immediately comes in your mind is that php is an application that needs to be installed we cannot copy this kind of application from one serve to another. Its kind of possible in a different way and this is where docker & VM comes in to picture.
What is Docker
Docker is a software application that performs operating system level virtualization, In other words Docker is a tool that allows you to install/deploy applications in an efficient way. To know how docker works we need to first understand about virtualization.
Virtualization
Letts say you have bought a powerful desktop with 32GB Ram 4TB hard disk and 6Core Processor on seeing that your son and daughter also asks for a separate system for them. Since you have already spend a lot of money on your system you cant afford to spend on 2 more new systems but also you cant say no to your kids. In this case, wouldn't be nice if you could just buy 2 monitors and connect them to your CPU so now you have 3 computes where you can save money and also make your kids happy as well 🙂 Of course it would be nice but how its possible ?
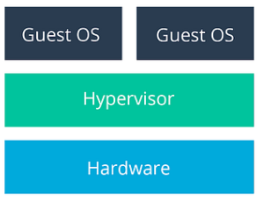
Virtualization makes this possible, Its a technique of splitting the physical hardware in to a separate logical hardware and in those logical hardware we can install a separate OS

Hypervisor
This virtualization is done using a software called hypervisor. A hypervisor is a type of computer software, firmware (A low-level software that sits between the hardware and the OS) that creates and runs virtual machines.
There are two types of hypervisor
Type 1:
- A Type 1 hypervisor runs directly on the underlying computer's physical hardware, interacting directly with its CPU, memory, and physical storage.
- Also called as bare metal hypervisor because its installed on top of hardware even before installing any OS
- This hypervisor itself will behave as a OS. Ex VMware EXSI
- Usually Type 1 hypervisor are used in Big Big Enterprise and Data centers we will not use this in our laptop or day to day development activities.
Type 2 :
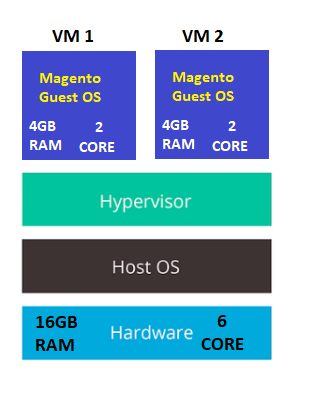
- A Type 2 hypervisor, is installed as a software application on an existing operating system. With this software we can create any no of Virtual Machines with its own operating system.
- Few examples of type 2 hypervisor are VMware Workstation, Oracle VirtualBox, WSL2
- It doses not have direct access to the hardware but each VM is allocated a dedicated hardware.
- These VM1 and VM2 can be packaged as a whole (OS + PHP + Nginx + ES + etc + Magento) which is called as VM Image.
- This VM Image can be moved to PROD or TEST server and can be booted.
- So Instead of Just moving the Source Code, we can now move the complete OS + Software with the help of VM's
Virtual Machine Drawbacks
Though VM's solves our problem of moving the complete OS form one place to another it also gives us the below issues.
Resource Allocation
- Every VM that you create in your machine has to be allocated a separate RAM, Processor, Storage, So the more VM you create you system will get slow down.
- In Every VM we should install a separate OS, This will result in consuming more storage space and also cost.
Package Size (VM Image)
When you create an package(VM image) of the VM the OS within the VM will also get included which will result in huge size this will increase the time for creating the image and will become inconvenient in moving the image from one server to the another
This is where docker comes in to picture, where it solves these problem.
Docker Containers vs Virtual Machines
To know the difference lets first look at how an Operating System is made up of. An Operating System has 2 Layers OS Kernel and the Application Layer. OS Kernel is the one that will communicate with the hardware of the system and the applications layer is build on top of the Kernel Layer.
In Linux operating system there are hundreds of distributions such as centos, ubuntu etc They all look different in terms of GUI and the application they have in it. But under the hood they uses the same Linux kernel.
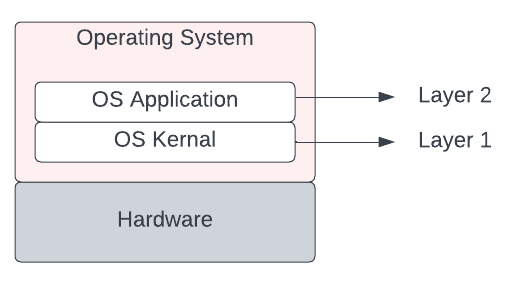
As we know Docker and Virtual Machine are both virtualization tools. But they differ in terms of which layer of the operating system they virtualize. Virtual Machine virtualizes the complete OS (OS Kernal + Application) In terms of Docker it virtualize only the application layer of the guest OS.
| Docker Container | Virtual Machine |
|---|---|
| No Separate OS required, Uses the OS Kernel of the Host Operating System. | A Complete OS will be installed in all the VM's |
| No Dedicated hardware | Dedicated hardware such as RAM, Storage Size, Processor needs to be assigned for each VM |
Docker Containers
Docker containers are advanced version of Virtualization. Docker will not create virtual machines but it will create containers which does the same job as virtual machine but in a better way .

Think of a container as a small, lightweight box that contains everything your application needs to run, including the code, system tools, dependent application such as php, mysql, nginx etc, and the settings. This means that you don't need to worry about installing and configuring all the dependencies on each machine where you want to run your application.
Containers can be as small as 10MB and you can easily limit their memory and CPU usage. This makes containers remarkably lightweight and fast to launch as opposed to deploying virtual machines, where the entire operating system needs to be deployed.
Packaging and moving a container image from one place to another is very easy when compared to VM image. The dependent software's will get downloaded from the Docker Hub, We will see this later.
Docker Installation
Docker is available for Mac, Linux and Windows and installing it is very straight forward https://docs.docker.com/engine/install/
Once you have docker installed you will have the "docker" command line tool available.

Docker Hub
Once you have docker installed, now we need to create the container right, To create a container we need a container image.
A Docker container image is a lightweight, standalone, executable package that contains everything needed to run a piece of software. Container Images can be downloaded from the Docker Hub. A docker hub is a a public/private repo where we store the container images. Software vendors, you/me will store their application as a container image in the Docker repository. For every software application there will be an official image along with several non official images. To see the container images that are available in our system we can use the command
docker images
In our system we have just installed the docker so we don't have any images or any container.

Downloading these images can be done with the below command
docker pull imagename
Ex : docker pull nginx
To find the image name we can visit the docker hub portal https://hub.docker.com/ and search for the application that we need
Container Image vs Container
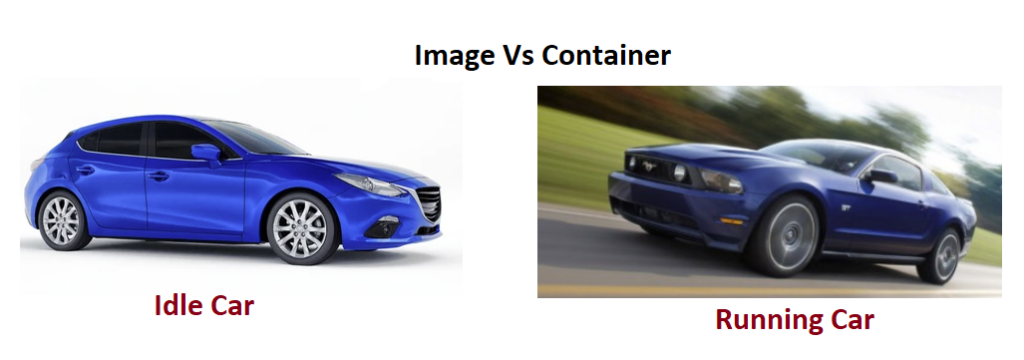
A Docker container image is a pre-built, static snapshot of a containerized application, along with all its dependencies and configurations. It is a read-only template that can be used to create multiple instances of the same container on different hosts. Container images are stored in a registry and can be easily shared and distributed across teams and environments.
A Docker container, on the other hand, is a running instance of a container image. So if the image is idle we call it as just Image, If the image is started and in the running state we call it as Container.
Create Docker Containers
To create a docker container its pretty use, Say if we need to create a Ubuntu container (aka ubuntu virtual machine) We just need the below 2 commands
docker pull ubuntu
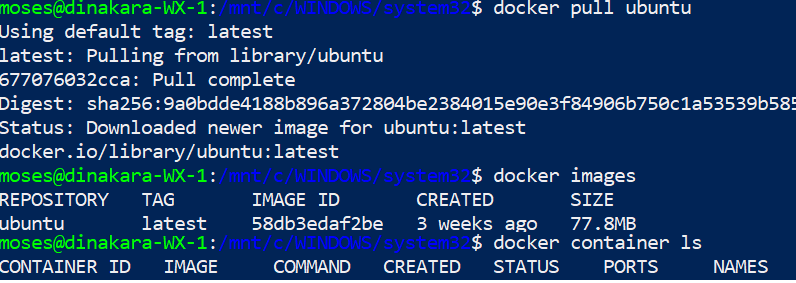
We have pulled the docker image ubuntu from docker hub but its not started yet, i.e We have not created the container yet. To create the container we issue the next command
docker run -ti -d ubuntu
Now we have a ubuntu container ( aka virtual machine ) running on windows.
Immediately you may ask, We discussed earlier container doesn't has its own OS then why are we pulling ubuntu OS?
Though docker containers does not require to have a complete OS (Kernel Layer + Application Layer), but they still need an operating system to run. However, unlike a traditional virtual machine, a Docker container shares the same kernel with the host operating system, but downloads a minimal application layer of ubuntu OS which will make is behave as a standalone ubuntu virtual machine.
So if you pull any application image ex docker pull nginx. This image will also have a very minimal OS within it. So while pulling the nginx image it will also pull a very minimal Base OS along with it.
Images are built in a layered architecture from a parent image. So we have a parent image and then this image is build on top of that parent Image. If you see dockerfile ( Dockerfile is a text file that contains a set of instructions or commands used to build a Docker image.) for an image you can see something like this
FROM debian:bullseye-slim
This will tell us from which parent image this image is build upon and in this case its build on base image of debian:bullseye-slim. This base image is basically an minimalistic OS without the kernel.
All good, But as per docker it can install linux container on Windows machine so how come docker uses the Windows Kernel to run Linux container
Under the hood, Docker for Windows uses a lightweight virtualization technology called "Hyper-V" to create a virtual machine that runs a small Linux kernel, which is responsible for managing the Docker containers. This Linux kernel is the same one used by Docker on other platforms, such as macOS and Linux.
Some Limitations to my knowledge (May be it will change in the future)
- We cannot run Linux Container and the Windows Container at the same time.
- Windows based Container cannot run on Linux and Linux based containers wont run on Windows Machine
Docker Containerization
Docker containerization lets you package your application and its dependencies into a single unit, which can be easily deployed and managed in any environment.
Our goal here is to create a ubuntu container and install magento then this container will be packaged and moved to Docker Hub where we can use it in any TEST or PROD environment.
Install Ubuntu
Lets create a ubuntu container using the run command, At this point docker will assign a unique id for the container and a fancy name.

Now we have created a container and ubuntu is running on it. Lets login to ubuntu. To do so we have the exec command,The docker exec command runs a new command in a running container.
docker exec containeid command
Ex docker exec -ti CONTAINERID bash
Since we need to login to our newly created container our command should be "bash". Bash command will create a container shell

-ti -> This is for interactive session which is important
Once you are in the container and if we see the hostname, we will get the ContainerID, So basically outside application willl communicate to this container using this ContainerID
Now that we are in the ubuntu container we can run all the basic ubuntu commands.

Install Nginx and Other Applications
apt install nginx
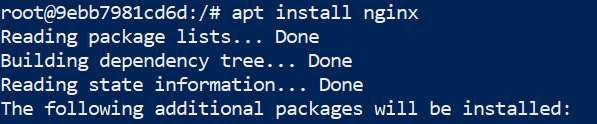
The ubuntu base image that we downloaded will be very light weight it will not have most of the commands that you use regularly for ex systemctl will not be available which needs to be installed

No we a Ubuntu Container where Nginx is installed on it. Like wise we can install all the necessary application.
Once we are completely done with the Magento Setup, We need to package this container and push to Docker Hub.
Creating a Container Image ( or Packaging)
There are two ways to create a docker image.
- Using an Existing Image
- Building form the scratch using a DockerFile
Using an Existing Image
Remember we pulled this "ubuntu" container and installed magento over it and now we are going to create an image of this container and adding it to Docker Hub.
Docker Login
First create an account in the docker hub. Now use that account credentials and login to the docker that you have installed in your system.
docker login

Create the Container Image
Identify the container for which we need to create the image. In our case its the "ubuntu" container where we have installed Magento
Now to create an image we need to use the commit command Use the docker ps command to find the container ID
docker commit containerID <username>/<newimagename>
Ex docker commit containerID mosesdinakaran/ubuntu_magento
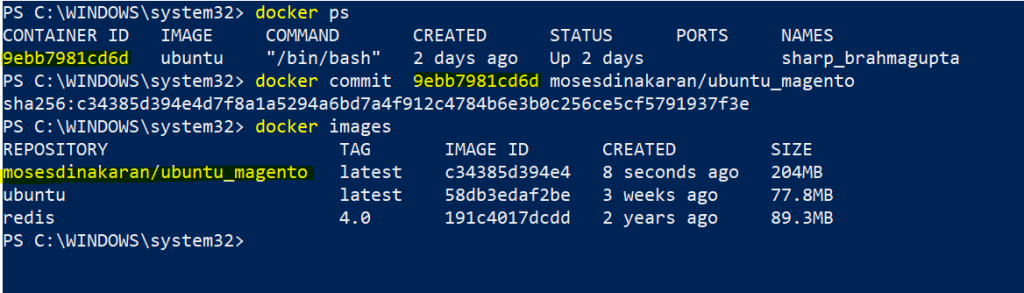
Username is required because, Only then docker will know to which user account this container needs to be pushed.
Now we have a new image named "mosesdinakaran/ubuntu_magento" created.
Push Container Image to Docker Hub
Once we have created the container image we need to push this image to docker hub, To do so use the below command
docker push username/newimagename
Ex docker push mosesdinakaran/ubuntu_magento

Once the image is pushed it will be available in our account.

Note, We have not pushed this new container image to ubuntu repo but to our personal repository with a new name "ubuntu_magento"
This new container image can be now pulled from any server.
Building form the scratch using a DockerFile
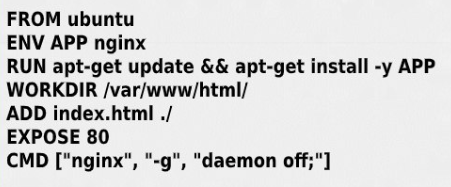
Write a Dockerfile
A Dockerfile is a text file that specifies the instructions needed to create a container image. It typically includes information about the base image, any additional software or dependencies needed, and any configuration settings required for the application.
Build the image:
Once you've written your Dockerfile, you can use the Docker command line tool to build the container image. This process involves running the instructions in the Dockerfile to create a new image that includes your application and all its dependencies.
Push the image to a registry:
Once you've built the container image, you'll typically want to push it to a Docker registry. This is a central location where you can store and distribute container images, so that they can be easily accessed and deployed by others.
Deploy the container:
Once your container image is in the registry, you can use it to deploy your application to any environment that supports Docker containers. This might involve running the container locally on your own computer, or deploying it to a cloud-based hosting platform like Amazon Web Services (AWS) or Microsoft Azure.
Running 2 Version Of the Same Application
Lets say if we need to run 2 redis version on our laptop its very easy with docker, We just need to create 2 containers with the respective version
docker run redis -> Install the latest version
docker run redis:4.0 -> Install the version 4.0

In the above image we see 2 containers listening to the incoming request on the same port. In both the redis image it was specified to run redis on 6379 port. So both containers open the same port So how does this actually work and how do we not have conflict while both are running on the same port ? This is because of container ports.

Your laptop will have certain ports available which can be opened for running certain application. In our case a separate laptop port will be opened for each container that yor run. To communicate between the laptop and the container you need to create a binding between the laptop(Host) port and the Container Port.
At present two redis container is running but they are unreachable because we didn't do any binding. So while running the container we need to make sure that we are binding that container port with that of the laptop port.
docker run laptopport:containerport imagename
Ex
docker run -p6000:6379 redis
docker run -p6001:6379 redis4.0
Now we have two redis version running on the same laptop which can be access thorough the binding ports.

To access Host from Docker Container
Use your internal IP address or connect to the special DNS name host.docker.internal which will resolve to the internal IP address used by the host.
This is for development purpose and does not work in a production environment outside of Docker Desktop.
Quick Commands
| To Build a docker image from the Doker file | docker build -t imagename:tagname . |
| To Run the Container | docker run -it -p 8085:80 ImageId localhost:8085 from the host will point to the port 80 of docker container |
| To Login to the Containe | docker exec -it conterid bash |
| To Delete a Docker Image | docker rmi -f imageID |
| Restart nginx withing the container | nginx -s reload |
References
Plz refer the below two videos if you need more information on this topic. It was really easy to follow and helpful.